How to Create a Starrupture Server Guide: Difference between revisions
Jump to navigation
Jump to search
(Created page with "= How to Create a StarRupture Server Guide = ''This page is an **early pre-release** guide. StarRupture enters Early Access on '''January 6, 2026'''. At the time of writing (December 15, 2025), the developers have showcased '''online co-op (up to 4 players)''' and confirmed the game is built on '''Unreal Engine 5'''. Public, self-hosted **dedicated server** details have **not** been formally announced. The steps below cover (A) renting a server with our control panel wh...") |
No edit summary |
||
| Line 1: | Line 1: | ||
= How to Create a | = How to Create a Starrupture Server Guide = | ||
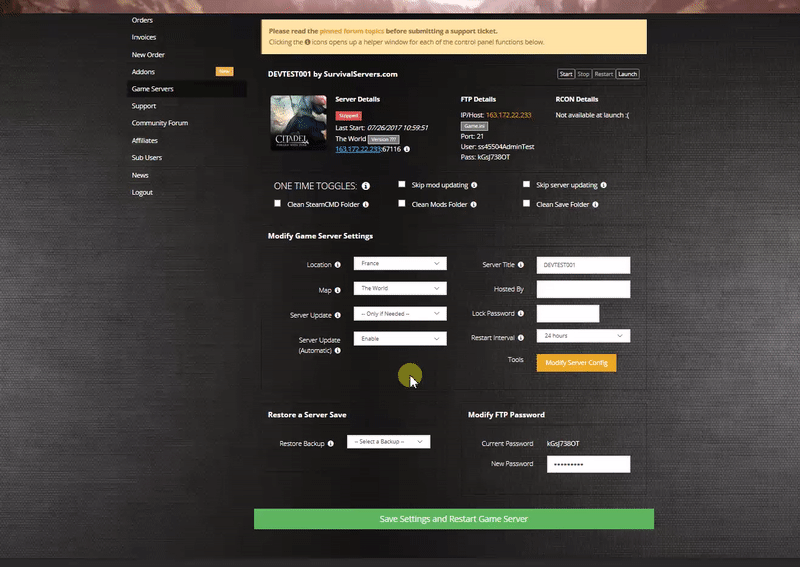
== Option #1: Renting a Starrupture server (example control panel below) == | |||
== Option #1: Renting a | |||
[[File:Control panel.gif|none|link=https://survivalservers.com/sspanel/?game=starrupture&trckaff=3881&trckit=WIKI]] | [[File:Control panel.gif|none|link=https://survivalservers.com/sspanel/?game=starrupture&trckaff=3881&trckit=WIKI]] | ||
''' | '''Included features''' | ||
* One-click install/updates | * One-click install/updates | ||
* Start/stop/restart and scheduled restarts | * Start/stop/restart and scheduled restarts | ||
* Config editor | * Config editor (server name, ports, player cap) plus raw INI access | ||
* Log viewer | * Log viewer and crash detection | ||
== Option #2: Hosting on Your Own PC or Dedicated Machine == | |||
=== Server Requirements === | |||
=== Server Requirements | * OS: Windows 10/11 or Windows Server 2019/2022 (64-bit) | ||
* | * CPU: 4 physical cores (i5/Ryzen 5 or better) | ||
* | * RAM: 16 GB+ | ||
* | * Storage: ~45 GB free | ||
* | * Network: Wired Ethernet | ||
* | |||
=== Step 1: Install the Server with SteamCMD === | |||
# Create a folder for the server, e.g. '''C:\Servers\Starrupture''' | |||
== Step 1: | |||
# Create a folder for | |||
# Place '''steamcmd.exe''' in that folder | # Place '''steamcmd.exe''' in that folder | ||
# Create | # Create '''SteamCMD.bat''' with: | ||
<pre> | <pre> | ||
@echo off | @echo off | ||
set SR_DIR=C:\Servers\ | set SR_DIR=C:\Servers\Starrupture | ||
set SR_APPID= | set SR_APPID=3809400 | ||
start "" steamcmd.exe +login anonymous ^ | start "" steamcmd.exe +login anonymous ^ | ||
+force_install_dir "%SR_DIR%" ^ | +force_install_dir "%SR_DIR%" ^ | ||
| Line 42: | Line 32: | ||
+quit | +quit | ||
</pre> | </pre> | ||
# | # Run '''SteamCMD.bat''' as admin | ||
=== Step 2: Launch the Dedicated Server === | |||
Binary: | |||
* '''StarRuptureServerEOS.exe''' (installed in the server folder) | |||
== Step 2: | |||
* ''' | |||
Create '''StartServer.bat''': | Create '''StartServer.bat''': | ||
<pre> | <pre> | ||
@echo off | @echo off | ||
set SR_DIR=C:\Servers\ | set SR_DIR=C:\Servers\Starrupture | ||
cd /d "%SR_DIR% | cd /d "%SR_DIR%" | ||
StarRuptureServerEOS.exe ^ | |||
-Log ^ | |||
- | |||
-MULTIHOME=YOUR.SERVER.IP ^ | -MULTIHOME=YOUR.SERVER.IP ^ | ||
-Port=7777 ^ | -Port=7777 ^ | ||
-QueryPort=27015 ^ | -QueryPort=27015 ^ | ||
-ServerName="My Starrupture Server" | |||
-ServerName="My | |||
</pre> | </pre> | ||
=== Port Forwarding === | |||
* 7777/UDP – game | |||
* 27015/UDP – query | |||
* | |||
* | |||
Allow the server executable through Windows Defender Firewall. | |||
== | === Configuration Files === | ||
* ''' | * Configs (INIs): ''...\Saved\Config\WindowsServer\'' (e.g., ''Game.ini'', ''Engine.ini'') | ||
* | * Saves/worlds: ''...\Saved\SaveGames\'' | ||
Stop the server before editing INIs. Back up the entire ''Saved'' folder regularly. | |||
== | == Common Admin Tasks == | ||
* '''Change server name''': edit the launch parameter ''-ServerName="Your Name"'' and restart. | |||
* '''Adjust player cap''': set your desired value with ''-MaxPlayers=#'' and restart. | |||
* '''Schedule restarts''': use Windows Task Scheduler to run ''StartServer.bat'' at off-hours. | |||
* '''Logs''': start with ''-Log'' (console) and check ''...\Saved\Logs\''. | |||
: | |||
== | == Troubleshooting == | ||
* '''Server not visible''': confirm ports and that ''-MULTIHOME'' matches the server’s bound/public IP. | |||
* '''Join timeouts''': forward 7777/UDP and 27015/UDP to the host; avoid double-NAT/VPN on the host. | |||
* '''Lag/rubber-banding''': reduce view-distance/density settings if available; keep the machine lean. | |||
Latest revision as of 10:19, 15 December 2025
How to Create a Starrupture Server Guide
Option #1: Renting a Starrupture server (example control panel below)
Included features
- One-click install/updates
- Start/stop/restart and scheduled restarts
- Config editor (server name, ports, player cap) plus raw INI access
- Log viewer and crash detection
Option #2: Hosting on Your Own PC or Dedicated Machine
Server Requirements
- OS: Windows 10/11 or Windows Server 2019/2022 (64-bit)
- CPU: 4 physical cores (i5/Ryzen 5 or better)
- RAM: 16 GB+
- Storage: ~45 GB free
- Network: Wired Ethernet
Step 1: Install the Server with SteamCMD
- Create a folder for the server, e.g. C:\Servers\Starrupture
- Place steamcmd.exe in that folder
- Create SteamCMD.bat with:
@echo off
set SR_DIR=C:\Servers\Starrupture
set SR_APPID=3809400
start "" steamcmd.exe +login anonymous ^
 +force_install_dir "%SR_DIR%" ^
 +app_update %SR_APPID% validate ^
 +quit
- Run SteamCMD.bat as admin
Step 2: Launch the Dedicated Server
Binary:
- StarRuptureServerEOS.exe (installed in the server folder)
Create StartServer.bat:
@echo off
set SR_DIR=C:\Servers\Starrupture
cd /d "%SR_DIR%"

StarRuptureServerEOS.exe ^
 -Log ^
 -MULTIHOME=YOUR.SERVER.IP ^
 -Port=7777 ^
 -QueryPort=27015 ^
 -ServerName="My Starrupture Server"
Port Forwarding
- 7777/UDP – game
- 27015/UDP – query
Allow the server executable through Windows Defender Firewall.
Configuration Files
- Configs (INIs): ...\Saved\Config\WindowsServer\ (e.g., Game.ini, Engine.ini)
- Saves/worlds: ...\Saved\SaveGames\
Stop the server before editing INIs. Back up the entire Saved folder regularly.
Common Admin Tasks
- Change server name: edit the launch parameter -ServerName="Your Name" and restart.
- Adjust player cap: set your desired value with -MaxPlayers=# and restart.
- Schedule restarts: use Windows Task Scheduler to run StartServer.bat at off-hours.
- Logs: start with -Log (console) and check ...\Saved\Logs\.
Troubleshooting
- Server not visible: confirm ports and that -MULTIHOME matches the server’s bound/public IP.
- Join timeouts: forward 7777/UDP and 27015/UDP to the host; avoid double-NAT/VPN on the host.
- Lag/rubber-banding: reduce view-distance/density settings if available; keep the machine lean.